|
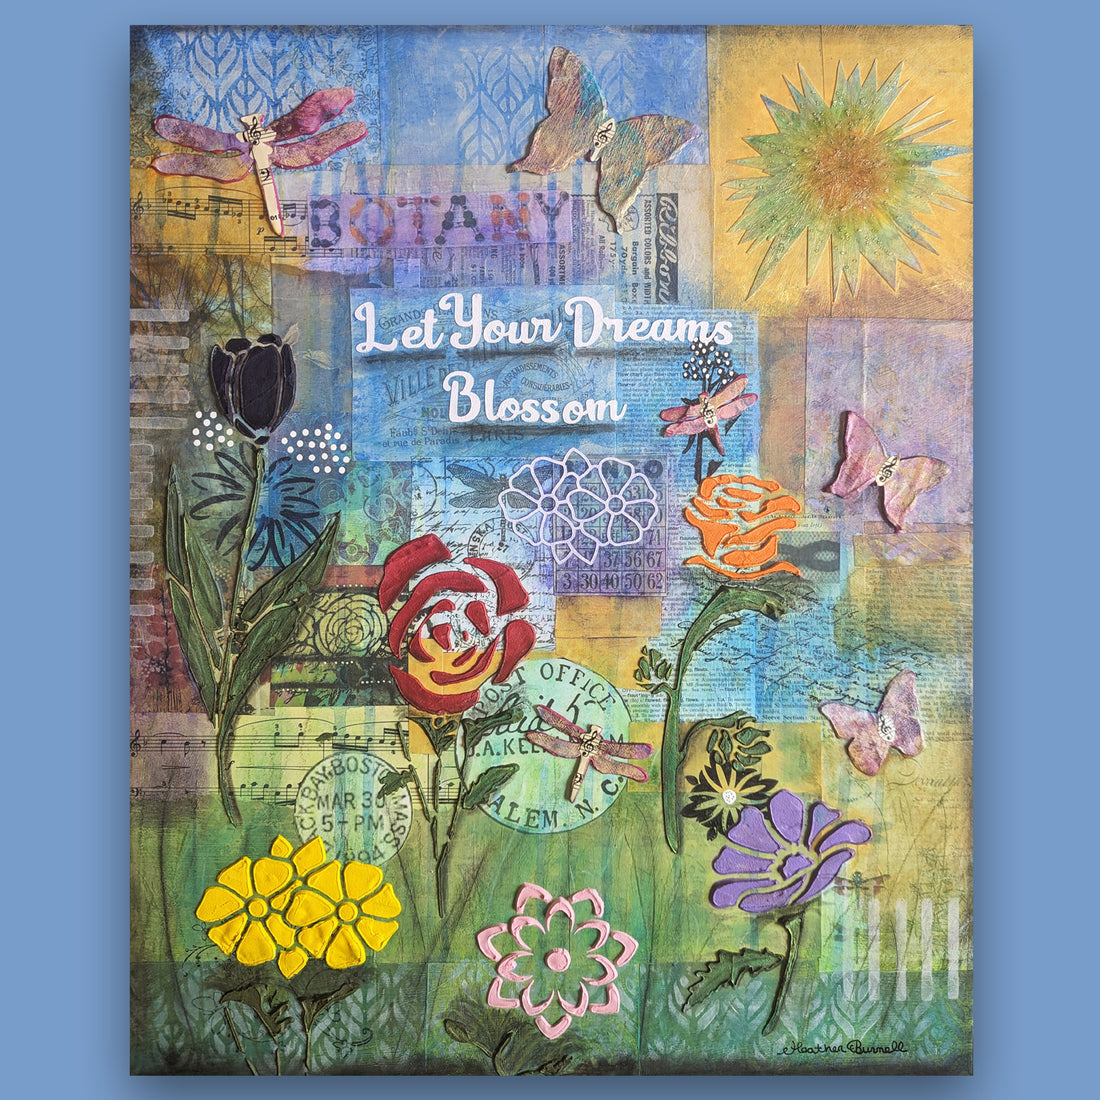
To see a close up of this painting, go to the product page, here, and hover your cursor over the picture. If you are on a phone, you may tap on the picture and expand it. I was working on this painting when my son asked me about my process. After I explained, briefly, how I created this piece, I decided that detailing my process would make a great BLOG post and mixed media learning tool. I recently spent a few weeks on Shawn Petite's "Expressive Florals" class. This piece is not from that class, but I used techniques that Shawn taught for creating a background. I also saw how Shawn does not let go of a piece until it is DONE. She keeps adding more and more detail until the piece comes alive. I did more of that on this piece than I usually do. |
 |
The numbers below refer to the red numbers in the corresponding picture. I started with a 16" x 20" x 1" birchwood cradle board. Then I added several different kinds of background papers. I glued all of them with Liquitex Matte Medium. 1. Vintage McCall's 1950's Knitting Magazine. The balls in the word, BOTANY, are balls of yarn. 2. Scrapbook paper 3. A birthday card 4. Stamps 5. A calendar 6. Vintage music 7. A piece from Shawn Petite's class |
 |
1. While the background dried, I used my Cricut cutting machine to cut the words, "Let Your Dreams Blossom." I cut it on white card stock. 2. I also used the Cricut and white card stock for the flower. 3. Cricut machines can also be used to create stencils. I created stencils for the pink and yellow flowers. Once the background dried, I added watered down acrylic paint in various shades. I used parchment paper as a paint palette. |
 |
1 & 2: The flowers (except for the white one), butterflies and dragonflies are 3D. I made them by mixing acrylic paint with Golden Light Molding Paste. For the dragonflies and butterflies, I added papers I made with a Gelli plate and made the bodies out of vintage sheet music. I made the dragonflies and butterflies first on wax paper then pasted them to the canvas board with Liquitex Gloss Gel which is better than Matte Medium for gluing heavier pieces. I added the floral molding paste directly to the canvas board. Once the flowers dried, I taped the bottoms with painter's tape and added the stems which were also made with Light Molding Paste and green acrylic paint. |
 |
1, 2, 3. I used charcoal pastels and pencils to shade along with blending tools. 4. The flower on the top right is covered with glass beads. 5. The white dots were made with an acrylic Sharpie. 6. A tip I learned from a class I took with Jodi Ohl is to take a picture of a piece that is near completion and turn it black and white. This shows where more contrast is needed. The area around the purple flower was too dark, so I used a stencil that I had made with the Cricut machine, to lighten the area. I applied Titan Buff to the stencil using a make up sponge then used the side of the makeup sponge to tap the paint so the stenciled area moved to the back. 7. I always sign my name with a black .7 size Fiber Castell Pitt pen. |
|
|
Other items that I used while making this piece are:
|